
![]()
Vagrant vSphere Provider
This is a Vagrant 1.6.4+ plugin that adds a
vSphere
provider to Vagrant, allowing Vagrant to control and provision machines using
VMware. New machines are created from virtual machines or templates which must
be configured prior to using this provider.
This provider is built on top of the
RbVmomi Ruby interface to the vSphere API.
Requirements
- Vagrant 1.6.4+
- VMware with vSphere API
- Ruby 1.9+
- libxml2, libxml2-dev, libxslt, libxslt-dev
Current Version
version: 1.13.3
vagrant-vsphere (version: 1.13.3) is available from
RubyGems.org
Installation
Install using standard Vagrant plugin method:
vagrant plugin install vagrant-vsphere
This will install the plugin from RubyGems.org.
Alternatively, you can clone this repository and build the source with gem build vSphere.gemspec. After the gem is built, run the plugin install command
from the build directory.
Potential Installation Problems
The requirements for Nokogiri must be installed before
the plugin can be installed. See the
Nokogiri tutorial for
detailed instructions.
The plugin forces use of Nokogiri ~> 1.5 to prevent conflicts with older
versions of system libraries, specifically zlib.
Usage
After installing the plugin, you must create a vSphere box. The example_box
directory contains a metadata.json file that can be used to create a dummy box
with the command:
tar cvzf dummy.box ./metadata.json
This can be installed using the standard Vagrant methods or specified in the
Vagrantfile.
After creating the dummy box, make a Vagrantfile that looks like the following:
Vagrant.configure("2") do, config, config.vm.box = 'dummy'
  config.vm.box_url = './example_box/dummy.box'

  config.vm.provider :vsphere do, vsphere, vsphere.host = 'HOST NAME OF YOUR VSPHERE INSTANCE'
    vsphere.compute_resource_name = 'YOUR COMPUTE RESOURCE'
    vsphere.resource_pool_name = 'YOUR RESOURCE POOL'
    vsphere.template_name = '/PATH/TO/YOUR VM TEMPLATE'
    vsphere.name = 'NEW VM NAME'
    vsphere.user = 'YOUR VMWARE USER'
    vsphere.password = 'YOUR VMWARE PASSWORD'
  end
end
And then run vagrant up --provider=vsphere.
Custom Box
The bulk of this configuration can be included as part of a custom box. See the
Vagrant documentation and the Vagrant
AWS provider
for more information and an example.
Supported Commands
Currently the only implemented actions are up, halt, reload, destroy,
and ssh.
up supports provisioning of the new VM with the standard Vagrant provisioners.
Configuration
This provider has the following settings, all are required unless noted:
host- IP or name for the vSphere APIinsecure- Optional verify SSL certificate from the hostuser- user name for connecting to vSpherepassword- password for connecting to vSphere. If no value is given, or the
value is set to:ask, the user will be prompted to enter the password on
each invocation.data_center_name- Optional datacenter containing the computed resource,
the template and where the new VM will be created, if not specified the first
datacenter found will be usedcompute_resource_name- Required if cloning from template the name of the
host or cluster containing the resource pool for the new VMresource_pool_name- the resource pool for the new VM. If not supplied, and
cloning from a template, uses the root resource poolclone_from_vm- Optional use a virtual machine instead of a template as
the source for the cloning operationtemplate_name- the VM or VM template to clone (including the full folder path)vm_base_path- Optional path to folder where new VM should be created, if
not specified template's parent folder will be usedname- Optional name of the new VM, if missing the name will be auto
generatedcustomization_spec_name- Optional customization spec for the new VMdata_store_name- Optional the datastore where the VM will be locatedlinked_clone- Optional link the cloned VM to the parent to share virtual
disksproxy_host- Optional proxy host name for connecting to vSphere via proxyproxy_port- Optional proxy port number for connecting to vSphere via
proxyvlan- Optional vlan to connect the first NIC tomemory_mb- Optional Configure the amount of memory (in MB) for the new VMcpu_count- Optional Configure the number of CPUs for the new VMmac- Optional Used to set the mac address of the new VMcpu_reservation- Optional Configure the CPU time (in MHz) to reserve for this VMmem_reservation- Optional Configure the memory (in MB) to reserve for this VMaddressType- Optional Configure the address type of the
vSphere Virtual Ethernet Cardcustom_attribute- Optional Add a
custom attribute
to the VM upon creation. This method takes a key/value pair,
e.g.vsphere.custom_attribute('timestamp', Time.now.to_s), and may be called
multiple times to set different attributes.extra_config- Optional A hash of extra configuration values to add to
the VM during creation. These are of the form{'guestinfo.some.variable' => 'somevalue'},
where the key must start withguestinfo.. VMs with VWware Tools installed can
retrieve the value of these variables using thevmtoolsdcommand:vmtoolsd --cmd 'info-get guestinfo.some.variable'.notes- Optional Add arbitrary notes to the VMreal_nic_ip- Optional true/false - Enable logic that forces the acquisition of the ssh IP address
for a target VM to be retrieved from the list of vm adapters on the host and filtered for a single legitimate
adapter with a defined interface. An error will be raised if this filter is enabled and multiple valid
adapters exist on a host.ip_address_timeout- Optional Maximum number of seconds to wait while an
IP address is obtainedwait_for_sysprep- Optional Boolean. Enable waiting for Windows machines to reboot
during the sysprep process
(#199). Defaults tofalse.
Cloning from a VM rather than a template
To clone from an existing VM rather than a template, set clone_from_vm to
true. If this value is set, compute_resource_name and resource_pool_name are
not required.
Template_Name
- The template name includes the actual template name and the directory path
containing the template. - For example: if the template is a directory called vagrant-templates
and the template is called ubuntu-lucid-template thetemplate_name
setting would be:
vsphere.template_name = "vagrant-templates/ubuntu-lucid-template"
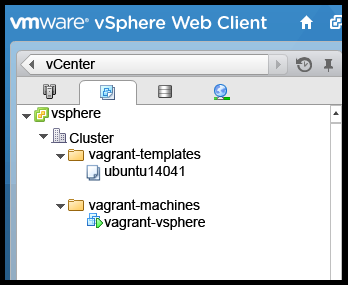
VM_Base_Path
- The new vagrant VM will be created in the same directory as the template it
originated from. - To create the VM in a directory other than the one where the template was
located, include the vm_base_path setting. - For example: if the machines will be stored in a directory called
vagrant-machines thevm_base_pathwould be:
vsphere.vm_base_path = "vagrant-machines"
Setting a static IP address
To set a static IP, add a private network to your vagrant file:
config.vm.network 'private_network', ip: '192.168.50.4'
The IP address will only be set if a customization spec name is given. The
customization spec must have network adapter settings configured with a static
IP address(just an unused address NOT the address you want the VM to be). The
config.vm.network line will overwrite the ip in the customization spec with the one you set.
For each private network specified, there needs to be a corresponding network adapter in
the customization spec. An error will be thrown if there are more networks than
adapters.
Auto name generation
The name for the new VM will be automagically generated from the Vagrant machine
name, the current timestamp and a random number to allow for simultaneous
executions.
This is useful if running Vagrant from multiple directories or if multiple
machines are defined in the Vagrantfile.
Setting addressType for network adapter
This sets the addressType of the network adapter, for example 'Manual' to
be able to set a manual mac address.
This value may depend on the version of vSphere you use. It may be necessary
to set this in combination with the mac field, in order to set a manual
mac address. For valid values for this field see VirtualEthernetCard api
documentation of vSphere.
vsphere.addressType = 'Manual'
Setting the MAC address
To set a static MAC address, add a vsphere.mac to your Vagrantfile.
In some cases you must also set vsphere.addressType (see above)
to make this work:
vsphere.mac = '00:50:56:XX:YY:ZZ'
Take care to avoid using invalid or duplicate VMware MAC addresses, as this can
easily break networking.
Troubleshooting
vCenter
ESXi is not supported. Make sure to connect to a vCenter server and not directly to an ESXi host. ESXi vs vCenter
Permissions
If you have permission issues:
- give the connecting user read only access to everything, and full permission to a specific data center. Narrow the permissions down after a VM is created.
- Be sure the path to the VM is correct. see the "Template_Name" screenshots above for more information.
Example Usage
FILE: Vagrantfile
VAGRANT_INSTANCE_NAME   = "vagrant-vsphere"

Vagrant.configure("2") do, config, config.vm.box     = 'vsphere'
  config.vm.box_url = 'https://vagrantcloud.com/ssx/boxes/vsphere-dummy/versions/0.0.1/providers/vsphere.box'

  config.vm.hostname = VAGRANT_INSTANCE_NAME
  config.vm.define VAGRANT_INSTANCE_NAME do, d, end

  config.vm.provider :vsphere do, vsphere, vsphere.host                  = 'vsphere.local'
    vsphere.name                  = VAGRANT_INSTANCE_NAME
    vsphere.compute_resource_name = 'vagrant01.vsphere.local'
    vsphere.resource_pool_name    = 'vagrant'
    vsphere.template_name         = 'vagrant-templates/ubuntu14041'
    vsphere.vm_base_path          = "vagrant-machines"

    vsphere.user     = 'vagrant-user@vsphere'
    vsphere.password = '***************'
    vsphere.insecure = true

    vsphere.custom_attribute('timestamp', Time.now.to_s)
  end
end
Vagrant Up
vagrant up --provider=vsphere
Vagrant SSH
vagrant ssh
Vagrant Destroy
vagrant destroy
Version History
See
CHANGELOG.md.
Contributing
See
DEVELOPMENT.md.
License
The Vagrant vSphere Provider is licensed under the MIT license. See
LICENSE.txt.
Credit
This software was developed by the National Snow and Ice Data Center with
funding from multiple sources.