RichTextView

![]()


![]()
![]()
![]()
![]()
![]()
iOS Text View (UIView) that Properly Displays LaTeX, HTML, Markdown, and YouTube/Vimeo Links
Installation
Using Cocoapods
Simply add the following to your Podfile:
pod 'RichTextView'
And run pod install in your repo.
Using Carthage
Simply add the following to your Cartfile:
github "tophat/RichTextView"
And run carthage update --platform iOS in your repo.
Usage
You can instantiate a RichTextView by importing the project first:
import RichTextView
To init a RichTextView:
let richTextView = RichTextView(
    input: "Test",
    latexParser: LatexParser(),
    font: UIFont.systemFont(ofSize: UIFont.systemFontSize),
    textColor: UIColor.black,
    isSelectable: true,
    isEditable: false,
    latexTextBaselineOffset: 0,
    interactiveTextColor: UIColor.blue,
    textViewDelegate: nil,
    frame: CGRect.zero,
    completion: nil
)
You can also update an existing RichTextView as follows:
richTextView.update(
    input: "Test",
    latexParser: LatexParser(),
    font: UIFont.systemFont(ofSize: UIFont.systemFontSize),
    textColor: UIColor.black,
    latexTextBaselineOffset: 0,
    interactiveTextColor: UIColor.blue,
    completion: nil
)
The parameters are defined as follows:
input- The string you want to renderlatexParser- You can pass your own class that conforms toLatexParserProtocolif you want to handle LaTeX parsing in a custom way. Currently we use theiosMathPod to handle LaTeX parsing by defaultfont- The font of the text to rendertexColor- The color of the text to renderisSelectable- A property that determines whether or notRichTextViewis selectableisEditable- A property that determines whether or notRichTextViewis editablelatexTextBaselineOffset- The baseline offset of the attributed text attachment that represents any LaTeX text that needs to be renderedinteractiveTextColor- The text color of any interactive elements/custom links (see Interactive element inFormatting the input)textViewDelegate- ARichTextViewDelegate- conforms toUITextViewDelegateand also has handling when interactive elements/custom links are tappedframe- ACGRectthat represents the frame of theRichTextViewcompletion- A completion block to handle any errors that might be returned. The input will still render even if there are errors, however it might look differently than expected.
Formatting the input
In order for the RichTextView to handle the various use cases it might encounter, the input string needs to be formatted as follows:
- LaTeX: Put any text you want to render as LaTeX in between two
[math]and[/math]tags. Example:[math]x^n[/math] - Code: Put any text you want to render as code in between two
[code]and[/code]tags. Example:[code]print('Hello World')[/code] - HTML/Markdown: No formatting necessary
- YouTube Videos: Put the ID of the YouTube video in a YouTube tag as follows:
youtube[dQw4w9WgXcQ]. The YouTube ID of any video can be found by looking at the URL of the video (Example:https://www.youtube.com/watch?v=dQw4w9WgXcQ) and taking the value right after thev=URL parameter. In this case the ID of the YouTube video isdQw4w9WgXcQ - Vimeo Videos: Put the ID of the Vimeo video in a Vimeo tag as follows:
vimeo[100708006]. The Vimeo ID of any video can be found by looking at the URL of the video (Example:https://vimeo.com/100708006) and taking the value right after the first/. In this case the ID of the Vimeo video is100708006 - Interactive element: If you want to add text that has custom handling when you tap it, put the text in between two
[interactive-element id=<id>]and[/interactive-element]tags. By doing this, when a user taps this text it will call thedidTapCustomLinkfunction ofRichTextViewDelegatewith the ID of the text that represents the interactive element (<id>), so be sure to hook intoRichTextViewDelegateto capture this.
Screenshots
Check out the sample project in the Example root folder to see the screenshots above in action!
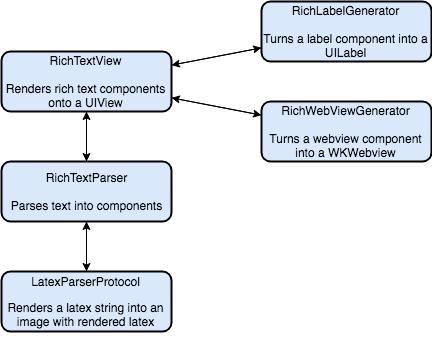
Architecture
Contributing
Simply clone the repo, run pod install and you should be good to go
If you want to visually devQA your changes you can navigate to the Example project (found in the root Example folder), run pod install and then build and run the app. This will show you some common usages of the RichTextView.
The example project points to the local copy of the RichTextView pod, so any changes made locally will be reflected in the sample project.
However, you need to be on the legacy build system to see your changes reflected. There is a known issue with caching development Pods and XCode 10.
Feel free to add additional input/output examples to the example project, especially if you add any new functionality.
Also, be sure to run the unit/UI tests locally as part of the devQA process.
Credits
Thanks goes to these wonderful people (emoji key):, Ahmed Elkady? ? ⚠️, Orla Mitchell? ? ?, Jake Bolam??, Sanchit Gera?, :---:, :---:, :---:, :---:, Monica Moore?, Brandon Baksh?, Siavash Bidgoly?, Stephen Truong?
Thanks to Carol Skelly for donating the Github organization and Kevin Zhow for donating the Pod name!