LabelImg


![]()
![]()
[![]() ]((https://github.com/jonatasemidio/multilanguage-readme-pattern/blob/master/README.pt-br.md)
]((https://github.com/jonatasemidio/multilanguage-readme-pattern/blob/master/README.pt-br.md)
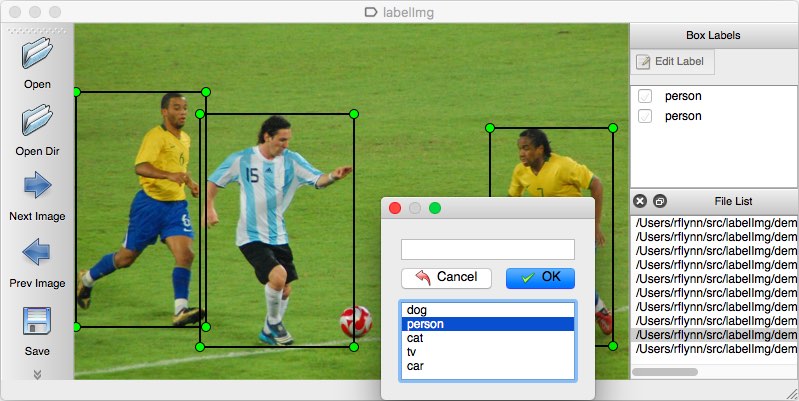
LabelImg is a graphical image annotation tool.
It is written in Python and uses Qt for its graphical interface.
Annotations are saved as XML files in PASCAL VOC format, the format used
by ImageNet. Besides, it also supports YOLO
and CreateML formats.
Installation
Build from source
Linux/Ubuntu/Mac requires at least Python
2.6 and has been tested with PyQt
4.8. However,
Python 3 or above and
PyQt5 are strongly recommended.
Ubuntu Linux
Python 3 + Qt5
sudo apt-get install pyqt5-dev-tools
sudo pip3 install -r requirements/requirements-linux-python3.txt
make qt5py3
python3 labelImg.py
python3 labelImg.py [IMAGE_PATH] [PRE-DEFINED CLASS FILE]
macOS
Python 3 + Qt5
brew install qt  # Install qt-5.x.x by Homebrew
brew install libxml2

or using pip

pip3 install pyqt5 lxml # Install qt and lxml by pip

make qt5py3
python3 labelImg.py
python3 labelImg.py [IMAGE_PATH] [PRE-DEFINED CLASS FILE]
Python 3 Virtualenv (Recommended)
Virtualenv can avoid a lot of the QT / Python version issues
brew install python3
pip3 install pipenv
pipenv run pip install pyqt5==5.12.1 lxml
pipenv run make qt5py3
pipenv run python3 labelImg.py
[Optional] rm -rf build dist; python setup.py py2app -A;mv "dist/labelImg.app" /Applications
Note: The Last command gives you a nice .app file with a new SVG Icon in
your /Applications folder. You can consider using the script:
build-tools/build-for-macos.sh
Windows
Install Python,
PyQt5 and
install lxml.
Open cmd and go to the labelImg directory
pyrcc4 -o libs/resources.py resources.qrc
For pyqt5, pyrcc5 -o libs/resources.py resources.qrc

python labelImg.py
python labelImg.py [IMAGE_PATH] [PRE-DEFINED CLASS FILE]
Windows + Anaconda
Download and install
Anaconda (Python 3+)
Open the Anaconda Prompt and go to the labelImg directory
conda install pyqt=5
conda install -c anaconda lxml
pyrcc5 -o libs/resources.py resources.qrc
python labelImg.py
python labelImg.py [IMAGE_PATH] [PRE-DEFINED CLASS FILE]
Get from PyPI but only python3.0 or above
This is the simplest (one-command) install method on modern Linux
distributions such as Ubuntu and Fedora.
pip3 install labelImg
labelImg
labelImg [IMAGE_PATH] [PRE-DEFINED CLASS FILE]
Use Docker
docker run -it \
--user $(id -u) \
-e DISPLAY=unix$DISPLAY \
--workdir=$(pwd) \
--volume="/home/$USER:/home/$USER" \
--volume="/etc/group:/etc/group:ro" \
--volume="/etc/passwd:/etc/passwd:ro" \
--volume="/etc/shadow:/etc/shadow:ro" \
--volume="/etc/sudoers.d:/etc/sudoers.d:ro" \
-v /tmp/.X11-unix:/tmp/.X11-unix \
tzutalin/py2qt4

make qt4py2;./labelImg.py
You can pull the image which has all of the installed and required
dependencies. Watch a demo video
Usage
Steps (PascalVOC)
- Build and launch using the instructions above.
- Click 'Change default saved annotation folder' in Menu/File
- Click 'Open Dir'
- Click 'Create RectBox'
- Click and release left mouse to select a region to annotate the rect
box - You can use right mouse to drag the rect box to copy or move it
The annotation will be saved to the folder you specify.
You can refer to the below hotkeys to speed up your workflow.
Steps (YOLO)
- In
data/predefined_classes.txtdefine the list of classes that
will be used for your training. - Build and launch using the instructions above.
- Right below "Save" button in the toolbar, click "PascalVOC"
button to switch to YOLO format. - You may use Open/OpenDIR to process single or multiple images. When
finished with a single image, click save.
A txt file of YOLO format will be saved in the same folder as your image
with same name. A file named "classes.txt" is saved to that folder
too. "classes.txt" defines the list of class names that your YOLO
label refers to.
Note:
- Your label list shall not change in the middle of processing a list
of images. When you save an image, classes.txt will also get
updated, while previous annotations will not be updated. - You shouldn't use "default class" function when saving to YOLO
format, it will not be referred. - When saving as YOLO format, "difficult" flag is discarded.
Create pre-defined classes
You can edit the
data/predefined_classes.txt
to load pre-defined classes
Hotkeys
Ctrl + u Load all of the images from a directory
Ctrl + r Change the default annotation target dir
Ctrl + s Save
Ctrl + d Copy the current label and rect box
Ctrl + Shift + d Delete the current image
Space Flag the current image as verified
w Create a rect box
d Next image
a Previous image
del Delete the selected rect box
Ctrl++ Zoom in
Ctrl-- Zoom out
↑→↓← Keyboard arrows to move selected rect box
Verify Image:
When pressing space, the user can flag the image as verified, a green
background will appear. This is used when creating a dataset
automatically, the user can then through all the pictures and flag them
instead of annotate them.
Difficult:
The difficult field is set to 1 indicates that the object has been
annotated as "difficult", for example, an object which is clearly
visible but difficult to recognize without substantial use of context.
According to your deep neural network implementation, you can include or
exclude difficult objects during training.
How to reset the settings
In case there are issues with loading the classes, you can either:
-
From the top menu of the labelimg click on Menu/File/Reset All
Remove the [.labelImgSettings.pkl]{.title-ref} from your home directory. In Linux and Mac you can do:

:   [rm \~/.labelImgSettings.pkl]{.title-ref}
How to contribute
Send a pull request
License
Citation: Tzutalin. LabelImg. Git code (2015).
https://github.com/tzutalin/labelImg
Related and additional tools
- ImageNet Utils to
download image, create a label text for machine learning, etc - Use Docker to run
labelImg - Generating the PASCAL VOC TFRecord
files - App Icon based on Icon by Nick Roach
(GPL) - Setup python development in
vscode - The link of this project on iHub
platform - Convert annotation files to CSV format or format for Google Cloud
AutoML
Stargazers over time
